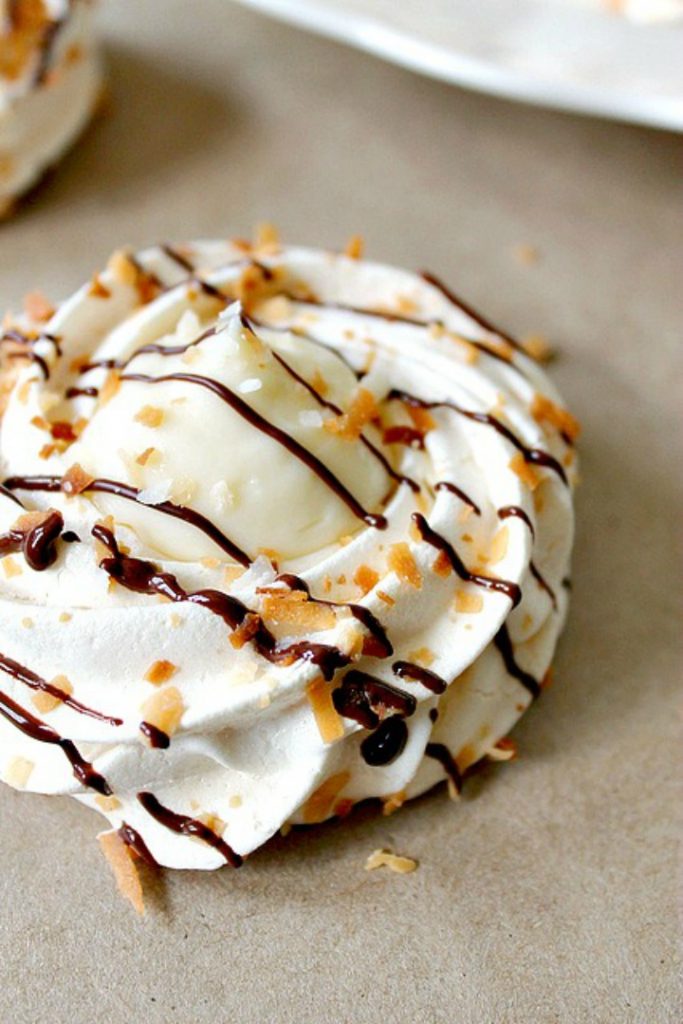
Toasted Coconut Pavlovas with Coconut Custard. Crisp meringue nests house a creamy coconut custard filling in these beautiful treats.
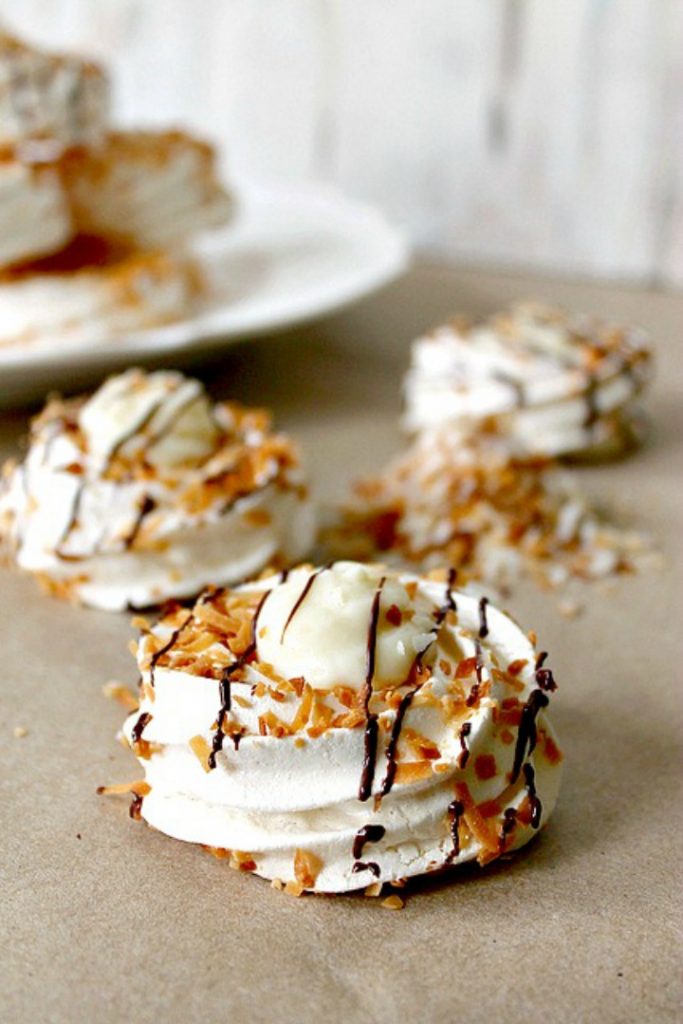

When I came across a post about a visit to Echo Restaurant in Palm Beach back in 2013 and found this recipe for mini pavlovas buried at the bottom, I knew right away that I needed to give these pretty babies their very own post, especially because they’re too perfect.
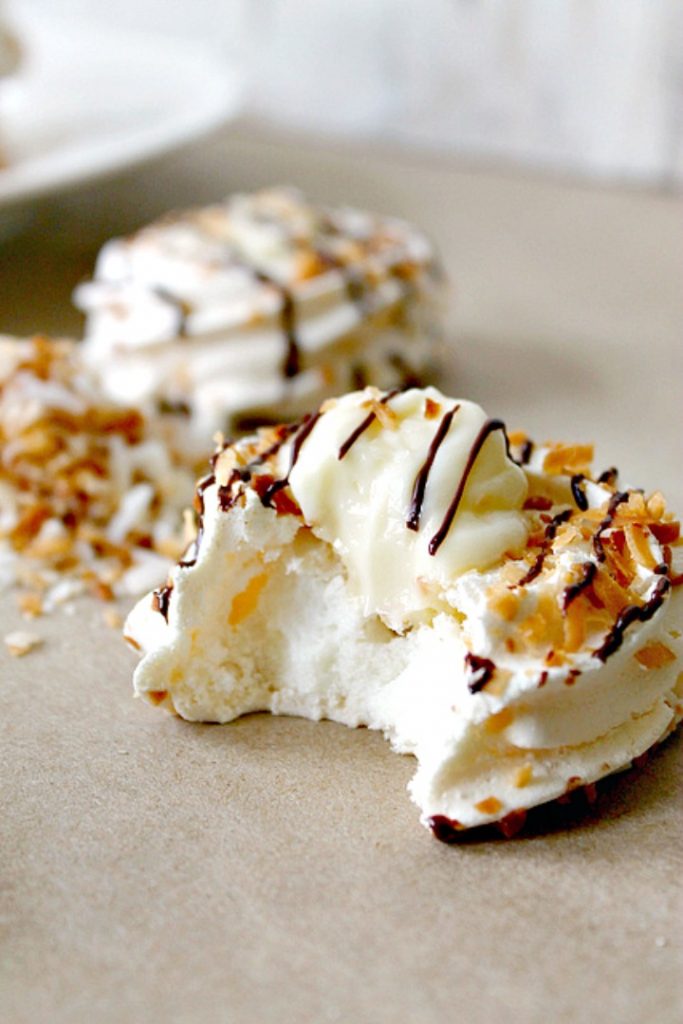

While these Toasted Coconut Mini Pavlovas with Coconut Custard are nowhere near as entrancing as Echo’s towering souffle, they are a pretty fancy little dessert you can whip up right at home. Crisp, coconut meringue “nests” are sprinkled with toasted coconut flakes, then filled with a dollop of silky coconut custard and drizzled with chocolate. Heavenly.

See Also

Almond Joy Overnight Oats
Despite the fact that they look elegant, there’s really not much to making meringues {or pavlovas}, or the custard filling for that matter, so there’s no need to shy away from giving them a go.
A FEW TIPS
Some people say that “old eggs” make better meringues, though I haven’t tested this theory. Don’t go as far as using expired eggs, but entertain the idea of using up the eggs that have been sitting in the fridge awhile over a fresh carton from the store.
Make sure your bowl {and your crack} is clean. Your egg crack, I mean. Even a teensy bit of egg yolk or fat will ruin your chances of achieving billowy meringue, so if you accidentally poke a yolk while you’re separating your eggs, don’t be lazy and start over with a clean bowl.
Check the weather report the day you’re planning on making your meringues. High humidity = sad, sticky meringues. Additionally, letting the meringues sit in the oven {once you’ve turned it off } with the door slightly cracked will help them dry out fully and stay crisp, so if you have time, it’s worth the wait.
Don’t skip the cream of tartar. I know it’s tempting since it’s not something most people have sitting around in their pantry, but it helps to stabilize the egg whites and ensure that your meringue stiffens up for smooth piping. If you really, really don’t want to spend the few bucks or make the trip to the store, 1/2 teaspoon lemon juice will work in a pinch. But just grab a container during your next grocery trip — it doesn’t expire, so it’ll last forever.
Not a fan of coconut? Omit the flakes & use a different extract. Just a drop will do! For the custard, replace the coconut milk with plain milk.
If you’re intimidated by the thought of piping the meringue nests, skip it and use an ice cream scoop instead. Plop mounds of meringue onto the prepared baking pan and make a well in the center with a spoon before baking. Done and done.
If you don’t plan on serving the pavlovas the same day that you make them, store them {unfilled} in an airtight container until you’re ready to fill them and serve them. Once they’re filled, the moisture from the custard will obviously encourage them to soften — so eat ’em up quick!
Click HERE for the coconut custard filling recipe.
.tasty-recipes-print-button{background-color:#667;border:none;display:inline-block;padding:.5em 1em;text-decoration:none}body:not(.tasty-recipes-print-view) .tasty-recipes-print-button.tasty-recipes-print-above-card{color:#fff;display:none}body:not(.tasty-recipes-print-view) .tasty-recipes-print-button.tasty-recipes-print-above-card:hover{background-color:#b2b2bb;color:#fff;display:inline-block;padding:.5em 1em;text-decoration:none}.tasty-recipes-image-button-container{display:flex;flex-direction:column;flex-wrap:wrap;float:right;margin-left:10px}body.tasty-recipes-print-view .tasty-recipes-buttons{display:none}.tasty-recipes-image-button-container .tasty-recipes-buttons{margin-bottom:10px;margin-top:10px}.tasty-recipes-image-button-container .tasty-recipes-button-wrap{box-sizing:border-box;margin-bottom:10px}.tasty-recipes-image-button-container .tasty-recipes-buttons a{background-color:#f9f9f9;border:1px solid #aaa;border-radius:0;color:#aaa;display:block;font-size:16px;font-weight:700;line-height:16px;margin-top:0;padding:8px;text-align:center;text-decoration:none;text-transform:uppercase}.tasty-recipes-image-button-container .tasty-recipes-buttons .button:hover{background-color:#aaa;border:1px solid #aaa;color:#fff;opacity:1}.tasty-recipes-image-button-container .tasty-recipes-buttons a:hover{background-color:#979599;text-decoration:none}.tasty-recipes-image-button-container .tasty-recipes-buttons svg{display:none}.tasty-recipes-yield-scale{border:1px solid #979599;border-radius:2px;color:#979599;font-size:.7rem;margin-left:3px;padding:0 4px}.tasty-recipes-units-scale-container{display:flex;flex-wrap:wrap}.tasty-recipes-convert-container{padding:0 1em 1em 0}.tasty-recipes-convert-container .tasty-recipes-convert-label{align-self:center;color:#979599;font-size:.6rem;text-transform:uppercase}.tasty-recipes-convert-container button{background:transparent;border:1px solid #353547;border-radius:2px;color:#353547;letter-spacing:0;margin-left:5px;min-width:34px;padding:2px 4px;text-align:center}.tasty-recipes-convert-container button.tasty-recipes-convert-button-active{background-color:#000;border-color:#000;color:#fff}.tasty-recipes-convert-container button:focus{outline:none}.tasty-recipes-scale-container{display:flex;padding:0 0 1em}.tasty-recipes-scale-container .tasty-recipes-scale-label{align-self:center;color:#979599;font-size:.6rem;text-transform:uppercase}.tasty-recipes-scale-container button{background:transparent;border:1px solid #353547;border-radius:2px;color:#353547;letter-spacing:0;margin-left:5px;min-width:34px;padding:2px 4px}.tasty-recipes-scale-container button.tasty-recipes-scale-button-active{background-color:#000;border-color:#000;color:#fff}.tasty-recipes-scale-container button:focus{outline:none}.tasty-recipes-ingredients-header{margin:1em 0}@media only screen and (min-width:520px){.tasty-recipes-ingredients-header{align-items:center;display:flex;flex-wrap:wrap;justify-content:space-between}}.tasty-recipes-ingredients-header .tasty-recipes-ingredients-clipboard-container{align-items:baseline;display:inline-flex}.tasty-recipes-ingredients-header h3{margin:0 10px 10px 0}.tasty-recipes-ingredients-clipboard-container .tasty-recipes-copy-button{background:transparent;border:none;color:#353547;height:24px;padding:0;position:relative;width:24px}.tasty-recipes-ingredients-clipboard-container .tasty-recipes-copy-button:hover{opacity:.5}.tasty-recipes-instructions-header{align-items:baseline;display:flex;flex-wrap:wrap;justify-content:space-between;margin:1em 0}.tasty-recipes-entry-content .tasty-recipes-instructions h3{margin:0 0 1rem}@media only screen and (min-width:520px){.tasty-recipes-entry-content .tasty-recipes-instructions h3{margin:0}}button[name=tasty-recipes-video-toggle]{background:#979599;border:#979599;border-radius:2px;display:inline-block;font-size:14px;height:30px;line-height:20px;margin:0;padding:0;text-align:center;vertical-align:middle;width:86px}button[name=tasty-recipes-video-toggle] span{padding:0 4px;pointer-events:none}button[name=tasty-recipes-video-toggle][aria-checked=false] :last-child,button[name=tasty-recipes-video-toggle][aria-checked=true] :first-child{background:#fff;border-radius:2px;color:#979599;padding:2px 4px}button[name=tasty-recipes-video-toggle][aria-checked=false] :first-child,button[name=tasty-recipes-video-toggle][aria-checked=true] :last-child{color:#fff}label[for=tasty-recipes-video-toggle]{color:#979599;font-size:.6rem;line-height:30px;padding-right:8px;text-transform:uppercase;user-select:none;-moz-user-select:none;-ms-user-select:none;-webkit-user-select:none;-o-user-select:none;vertical-align:middle}.tasty-recipe-responsive-iframe-container{margin:10px 0}.tasty-recipes-equipment{display:flex;flex-wrap:wrap;justify-content:space-evenly}.tasty-recipes-equipment>h3{flex:0 0 100%}.tasty-recipes-equipment .tasty-link-card{flex:0 0 50%;padding:1.5rem 1rem;text-align:center}@media screen and (min-width:500px){.tasty-recipes-equipment .tasty-link-card{flex:0 0 33%}}.tasty-recipes-equipment .tasty-link-card p{font-size:1em;font-weight:700;margin-bottom:0}.tasty-recipes-equipment .tasty-link-card p a{color:initial}.tasty-recipes-equipment .tasty-link-card span{font-size:.9em}.tasty-recipes .tasty-recipes-nutrition ul{list-style-type:none;margin:0;padding:0}.tasty-recipes .tasty-recipes-nutrition ul:after{clear:both;content:” “;display:block}.tasty-recipes .tasty-recipes-nutrition li{float:left;list-style-type:none;margin-bottom:0;margin-left:0;margin-right:16px}.tasty-recipes-plug{align-items:center;display:flex;flex-wrap:wrap;justify-content:center;margin-bottom:1em;text-align:center}.tasty-recipes-plug a{box-shadow:none;text-decoration:none}.tasty-recipes-plug a img{display:inline-block;height:auto;margin:5px 0 0 8px;width:150px}.tasty-recipes-footer-content{padding:1.5em;text-align:center}.tasty-recipes-footer-content .tasty-recipes-footer-copy{margin-left:0}.tasty-recipes-footer-content img,.tasty-recipes-footer-content svg{width:60px}.tasty-recipes-entry-content .tasty-recipes-entry-footer h3{font-size:1.25em;margin:0 0 .25em;padding:0}.tasty-recipes-entry-footer p{font-size:.75em;margin:0}.tasty-recipes-entry-footer p a{border-bottom:none;box-shadow:none;text-decoration:underline}.tasty-recipes-flash-message{background-color:#fff;border-radius:4px;box-shadow:0 .3px .4px 0 rgba(0,0,0,.024),0 .9px 1.5px 0 rgba(0,0,0,.05),0 3.5px 6px 0 rgba(0,0,0,.1);color:#313135;display:inline-block;font-size:13px;letter-spacing:0;line-height:1.2em;margin-left:10px;padding:4px 10px}@media screen and (min-width:500px){.tasty-recipes-flash-message{padding:4px 10px}}.tasty-recipes-flash-message p{margin:0;padding:0;text-transform:none}@media screen and (min-width:500px){.tasty-recipes-footer-content{align-items:center;display:flex;justify-content:center;padding:1.5em 0;text-align:left}.tasty-recipes-footer-content .tasty-recipes-footer-copy{margin-left:.8em}}@media print{.tasty-recipes-no-print,.tasty-recipes-no-print *{display:none!important}}[data-tr-ingredient-checkbox]{cursor:pointer;list-style-position:outside;list-style-type:none!important;margin-left:0!important}[data-tr-ingredient-checkbox] .tr-ingredient-checkbox-container{position:relative}[data-tr-ingredient-checkbox] .tr-ingredient-checkbox-container input[type=checkbox]+label{display:inline-block;position:relative;vertical-align:middle}[data-tr-ingredient-checkbox] .tr-ingredient-checkbox-container input[type=checkbox]{clip:rect(1px 1px 1px 1px);clip:rect(1px,1px,1px,1px);height:1px;overflow:hidden;position:absolute!important;width:1px}[data-tr-ingredient-checkbox] .tr-ingredient-checkbox-container input[type=checkbox]+label:before{border:1px solid;border-radius:2px;content:””;display:inline-block;height:20px;margin-right:10px;position:relative;width:20px}[data-tr-ingredient-checkbox] .tr-ingredient-checkbox-container input[type=checkbox]:checked+label:after{border-bottom:2px solid;border-left:2px solid;content:””;display:inline-block;height:6px;left:4px;position:absolute;top:4px;transform:rotate(-45deg);width:12px}[data-tr-ingredient-checkbox] .tr-ingredient-checkbox-container input[type=checkbox]:focus+label:before{box-shadow:0 0 8px #5e9ed6;outline:1px solid #5d9dd5}[data-tr-ingredient-checkbox=checked]{opacity:.8;text-decoration:line-through}/* Tasty Recipes Elegant recipe card styles */ .tasty-recipes-display{border:0.15em solid;border-color:#fff;padding:1.5em;outline:.5em solid #f9f9f9;background:#f9f9f9;margin-bottom:1em}.tasty-recipes-plug{margin-bottom:1em}.tasty-recipes-display h2{font-weight:400;text-transform:uppercase;margin-top:0;padding-top:0}.tasty-recipes-rating .rating-label{font-size:0.8em;font-style:italic}.tasty-recipes-rating p{margin-bottom:1rem;margin-right:0.8rem;display:inline-block}.tasty-recipes-details{font-size:0.8em}.tasty-recipes-details ul li{list-style-type:none;display:inline-block;width:30%}.tasty-recipes-description p{font-size:.8em;font-style:italic}.tasty-recipe-ingredients h3,.tasty-recipes-ingredients h3,.tasty-recipe-instructions h3,.tasty-recipes-instructions h3,.tasty-recipes-equipment h3,.tasty-recipes-notes h3{font-weight:normal;margin-top:0.6em;margin-bottom:1.2em;text-transform:uppercase}.tasty-recipe-video-embed~.tasty-recipes-equipment{padding-top:1em}.tasty-recipes-notes{margin-bottom:1rem}.tasty-recipes-notes h3{font-size:1.2em}.tasty-recipes-notes p,.tasty-recipes-notes ul{font-size:0.8em}.tasty-recipes-nutrition h3{font-size:1em;text-align:center;margin-top:1em}.tasty-recipes-nutrition{padding:0.5em;border-top:.15em solid #fff}.tasty-recipes-nutrition ul li{list-style-type:none;font-size:0.8em;margin-left:0}@media only screen and (min-width:520px){.tasty-recipes-nutrition ul li{width:30%}}.tasty-recipes-keywords p{font-size:.8em;margin-top:1em;margin-bottom:1em}.tasty-recipes-entry-footer{text-align:center;padding-top:1rem}.tasty-recipes-print .tasty-recipes-details ul{padding-left:0}/*Print view styles*/ .tasty-recipes-print-view{font-size:11px;line-height:1.5em}.tasty-recipes-print-view .tasty-recipes-description p,.tasty-recipes-print-view .tasty-recipes-details,.tasty-recipes-print-view .tasty-recipes-notes p,.tasty-recipes-print-view .tasty-recipes-notes ul,.tasty-recipes-print-view .tasty-recipes-nutrition ul li{font-size:1em}.tasty-recipes-print-view h3{letter-spacing:0.1em;text-transform:uppercase}.tasty-recipes-print-view .tasty-recipes-nutrition{padding:0}.tasty-recipes-print-view .tasty-recipes-nutrition h3{text-align:left;font-size:1.2em;font-weight:normal}
Toasted Coconut Pavlovas


Print Recipe
Pin Recipe
- Prep Time: 30 minutes
- Cook Time: 2 hours 10 minutes
- Total Time: 2 hours 40 minutes
- Yield: 0 about 18 meringues 1x
- Category: Dessert
Ingredients
Scale
- 4 egg whites
- 1/4 teaspoon cream of tartar
- Pinch of salt
- 1 cup sugar (divided)
- 1/2 teaspoon vanilla extract
- 1/8 teaspoon coconut extract
- 1/2 cup sweetened coconut flakes (lightly toasted)
- Special Equipment: Piping Bag (open star tip, parchment paper or silicone baking mat)
For Coconut Custard filling:
- Click the link above the recipe.
Instructions
- Preheat oven to 200 degrees. Line 2 large baking sheets with parchment paper or silicone baking mats.
- In the bowl of a stand mixer fitted with the whisk attachment, combine the egg whites, cream of tartar and salt. Whisk for about 1-2 minutes until it starts to become frothy, then gradually stream in 2/3 cup sugar. Continue to whisk until the mixture becomes shiny and thick, about 2-3 more minutes.
- Add the vanilla extract and coconut extract, and beat well.
- Stop the mixer and remove the whisk attachment. Dip it into the meringue and pull it out straight up, then turn it over so the meringue forms a “peak”. If it holds its shape {“stiff peaks”}, its ready. If not, continue to whisk and test every so often until it does.
- Sprinkle in the remaining 1/3 cup of sugar, and carefully fold it in to the meringue as not to deflate all the fantastic whisking you’ve done.
- Fit a piping bag with an open star tip. Fill the bag with meringue. Pipe about 2 inch swirls {like you are frosting a cupcake, except flat} as the “floor” of your cup, then pipe a “wall” on top of the base. This cup will help hold the custard filling later on.
- Sprinkle the meringues with toasted coconut flakes, if desired. Bake the meringues for 2 hours. They should be dry and crisp, but check to make sure they are not browning. For truly crisp & set meringues, turn off the oven and allow them to sit for 3 to 4 more hours, undisturbed {or even overnight}.* NOTE:If all this talk of piping bags and star tips intimidates you, skip it! You can scoop a dollop of meringue onto the parchment or silicone and make a “well” in the center using a spoon. This will make for a more rustic presentation, but it will still work just as well & be just as delicious! Never pass up a recipe just because it might not turn out looking perfect.
- Make Custard: Set a small heatproof bowl and a fine mesh sieve nearby.
- In a small saucepan, whisk together sugar, cornstarch and salt.
- Slowly add milk, whisking continually, until the mixture is smooth {make sure there are no lumps}. Whisk in the coconut milk, egg yolks, and coconut extract.
- Over medium heat, whisk the mixture constantly until it begins to thicken, about 5 minutes. {Note: This will happen VERY suddenly. Don’t step away for even a second! It will go from pretty liquidy to a thick pudding-like texture quickly. Just keep whisking.}
- Once the mixture is thickened {again, it will happen all of a sudden}, remove it from the heat and continue to whisk, whisk, whisk until smooth. Reduce the heat to low, and whisk over low heat for about a minute. {Have I said “whisk” enough times yet?}
- Remove from heat and scrape into the mesh sieve, set over the heatproof bowl. Using the whisk or a spatula, press the custard through the sieve to ensure that there are no lumps. You should have a gorgeously silky custard.
- Cover the custard with plastic wrap, with the plastic wrap directly touching the top of the custard so it does not form a skin. Refrigerate until cool. {Make sure to lick the spatula. Mmmm.}
- Assemble pavlovas: The custard will have solidified a bit if it’s fully cooled. Whisk it vigorously to make it as smooth as possible. Fill each meringue “cup” with about a tablespoon of custard. {I put it in a zip top plastic bag & snip the tip for easy filling.} You will have leftover custard to enjoy as you please.
- Drizzle with melted chocolate {or caramel, even. Holy cow, I have to go try that immediately.} and sprinkle with toasted coconut if desired. Stand back and look at this work of art before devouring!
Notes
*A little coconut extract goes a long way in my opinion, so don’t overdo it.
Meringue recipe adapted from Food Network
Coconut Custard recipe adapted from Martha Stewart .


